#footballsunday 1.0 : Seahawks Pinwheel Cookies

I'm not one for keeping up with holidays and events on my blog, but with the NFL season starting this week, I have a ton of bookmarked recipes that I want to experiment with (those successful will be shared here with you).


Once I started understanding football and started following the Seahawks, we started a new tradition at home where my husband makes lunch or dinner on game day (so much fun to see him in the kitchen!) and this year I'm adding to the tradition with Seahawks/football themed desserts.


This week we play season open at home on Thursday night (guess who's coming home for work early!) And this weeks experiment was making 3 colored pinwheel cookies, made a little early to share with all of you :) (but cookies are more oval then circle, but tastes good the same!)


Not a Seahawks fan? Change the colors to match your team, here's a great chart to find your team colors!

Seahawks Pinwheel Cookies

Ingredients
1 batch shortbread cookies
blue and green food color (I use AmeriColor gels)

Extra Tools
wax paper
rolling pin
baking trays and cooling racks

Method
1. Divide the cookie dough into thirds, color one blue, one green and keep the third batch uncolored.
2. Roll each batch into rectangle between 2 sheets of wax paper. Roll the dough about 1/8th inch thick and about 9x13 rectangle.
3. Once all the colors have been rolled, stack them and freeze for about 5-7 mins. (This helps to prevent the dough from sticking to the wax paper)
4. Remove the dough sheets from the freezer, remove the wax paper and stack them on top of each other, make sure that the stack is still sandwiched between wax paper.
5. Once the dough comes back to room temperature, roll the dough into a circle using the wax paper on the bottom to prevent the dough from sticking to your hands.
6. Place the roll, wrapped in cling wrap in the fridge for about 10-15 mins. In the mean while preheat the oven to 350*F and line the baking sheets with wax paper.
7. Slice the dough roll and place them on the baking sheets about 1/2 inch apart and baking for 12-15 mins or till the cookie slides when pushed with a spatula.
8. Place the baking tray on the cooling rack and allow the cookies to cool on the tray before serving.

Check out the new page I created for more football themed desserts!
Go Hawks!
Farhana

#craftingnotcoding: The Wedding Card

Ever since my first crafty card club with Rachel at Ben Franklin Crafts and Frames I have fallen in love with the market street collection from my minds eye, and I look for any excuse to use it. This card is very similar to the anniversary card that I made a few weeks ago.


I pretty much winged it while making this card, so this is just a generalized idea of what I did, you can change it to match your style/occasion/recipient.

What you need:


- a sheet from my mind's eye market street 6 x 6 paper pad
- a few die cuts from my mind's eye market street mixed bag
- golden glitter tape
- a glitter golden heart die (punched using a heart punch, not pictured)
- kraft card base
- double sided tape
- scissors
- craft glue
- foam dots

What to do:
1. Trim the sheet of cardstock, so that it is a little bit smaller than the card base. Then cut off one third of the trimmed piece of paper. Stick the two alternating pieces on the card base. Add the glitter tape to hide the place were the two pieces meet.
2. Add a few die cuts of your choice. Since I made this a wedding card, I decided to add the sticker that says "find adventure everyday".

Happy Crafting!
Farhana

The (easy) Lemon-Poppy Seed Bundt Cake

Switching it up a bit this time and sharing what I like to refer to as a "grown up" recipe, as it is not all the visually appealing to the eye. Also this recipe is on the "healthier" side. Yes, I put healthier in air quotes, why? Because I didn't frost the cake, that's the only difference. The cake is not anything free, it has a lot of lemon-y goodness, so I decided to leave out the frosting and add a glaze instead.


Another reason I left out the frosting is because I was slightly short on time. So I took another short cut and used boxed mixes, I'm not a fan of cake mixes, but this adds a packet of instant pudding and I have been wanting to try a recipe with that mix. And there was a world of difference from adding the pudding, the cake was so moist, you didn't even feel the lack of frosting!


The instant pudding not only makes the cake moist, there is the added benefit that it makes the cake seem like its made from scratch! Go ahead and fool your guests when your short on time, I'll keep your secret!


The (easy) Lemon-Poppy Seed Bundt Cake


Adapted from Bake at 350

Ingredients

for the cake
1 box lemon cake mix (I used Duncan Hines brand)
1 box instant lemon pudding (I used Jello brand)
3/4 cup canola oil
3/4 cup water
4 large eggs

for the glaze
1 1/2 cups of powdered sugar
a few drops of lemon juice
1-2 Tbsp milk


Method
1. Preheat oven to 350*F and grease a bundt pan.
2. Add all cake ingredients to a mixing bowl and beat until mixed well.


3. Bake for 45-55 mins, in the middle rack of the oven.
4. Allow the cake to cool in the pan on a wire rack for about 10 mins.
5. While the cake is cooling, mix up the glaze, making sure not to think it out too much.
6. Turn the cake onto a serving dish and pour the glaze onto it.


Enjoy!
Farhana 

#craftingnotcoding: The Crafty Card Class [June 2014]

Its mid-August and I still haven't blogged about my June card class, yeah I'm not the best blogger out there. But, I'm here now, and you get to see all the cards that the awesome instructor, Rachel put together for crafty card club at Ben Franklin Craft and Frames.


As I delayed posting this, there are some cards that are outdated, but the ideas are so cute that you can change it around to match a current holiday or occasion.

1. The "Happy 4th" Card
This was made for 4th of July with firework printed paper and the obvious 4th on the front. I love her idea using doilies, just like this card. I got myself a pack and can't wait to start adding them to my card creations!


I know that this card says happy 4th, but you can easily change the number and make it suitable for a birthday or anniversary.

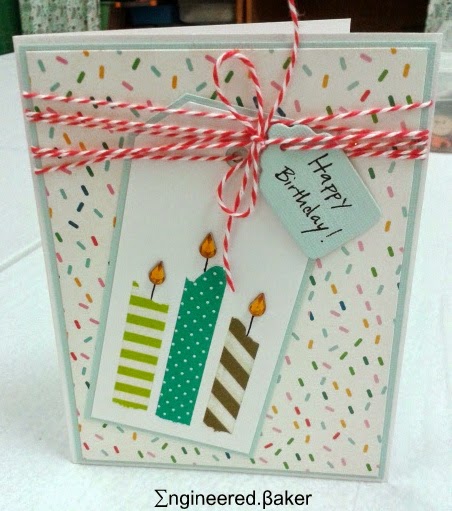
2. The "Candles" Happy Birthday Card
This card is so cute, and I love all the layering that goes into it. You use rhinestones, washi tape, die cuts and an assortment of papers, how fun is that!


3. The "Elephant" Card
This card is just the cutest, swap the colors of the elephant and the layering sheet and you can alternate between a boy or girl. This card is perfect for a baby shower or welcome baby!


4. The "Bling" CardI loved using the rhinestone mesh on this card, it was so fun! Cutting it out can be a bit of a challenge, but once it get the hang out it, its smooth sailing! And you can stamp a suitable sentiment before sending it out!


5. The "Hello" Card
This is SUCH an easy card! And it so versatile, you can change the word out to just about any message you want to send! The background is a double sided paper from Pebbles and I just love the color collection!


That's a wrap for June's class, hopefully these were an inspiration to you. I'll try be back with more of her ideas soon!

(please check out other card ideas on the blog and stay tuned for tutorials for these cards!)
Happy Crafting!
Farhana

#craftingnotcoding: The Ladybug "welcome baby" Card

As you all know I look for any excuse to go to Ben Franklin Crafts and Frames to die cut. This card can be made even if you do not have access to a die cutter, I'm just a tad bit OCD and wanted perfect circles. I made this for a friend's baby, but you can easily use it for a birthday.


What you need:


- black card base
- white layering sheet
- one black and one red large circle
- smaller black circle
mini punches
- red and black scrap paper
- foam stickers
- precision scissors
- glue
- double sided tape
- red pens
- paper trimmer
- twine (not pictured)

What to do:
1. Punch out 10-15 mini hearts in black. Cut the large red circle in half and glue on the mini hearts.
2. Using small drops of glue stick some twine onto the corner of white layering sheet (make sure this is trimmed down to be smaller than the card base) to make the antlers.
3. Punch out two black and two white mini circles (make sure the white ones are larger), stick them on the smaller black circle to create eyes.
4. Stick the circle with the eyes on the white sheet cover the ends of the twine.
5. Stick the large black circle, covering half of the small black circle.
6. Now stick the red pieces made in step 1, on the black circle.
7. Lastly attach the white sheet to the card base using foam dots. Add a sentiment inside and your set!

Happy Crafting!
Farhana

The Oreo Truffles

Lots of the blogs I follow seem to explode with recipes during the holidays, I on the other hand can hardly ever get near a computer to blog, I'm lucky if I can get a few decent pictures to use in a post later. Between Ramadan, Eid and crafting, not only have a not been blogging, I also seem to have forgotten that this is a baking blog!


Today's recipe is a dessert, but its a no bake dessert. This summer has been on the warmer side here in the PNW, so the less oven time, the better! This dessert is also very portable, so pack it up and head out to enjoy the weather!


I used regular Oreo's, but feel free to experiment with your favorite Oreo and leave a comment telling me how it turned out! I also like to change the sprinkles out to match the season or occasion, just to be fancy-shamcy. But you can also save some of the crushed cookies and sprinkle that on top.

The Oreo Truffle

Ingredients
18  OREO Cookies, finely crushed
4 oz. cream cheese, at room temperature
8 oz. semi-sweet chocolate, melted
sprinkles, optional

Extra Tools
wax paper
mini cupcake liners

Method
1. Mix cream cheese and remaining cookie crumbs until well mixed (you can use a kitchen aid or food processor)
2. Shape into 1-inch balls (you will get about 24). Dip into the melted chocolate, place on a baking sheet lined with wax paper. Top with sprinkles.
3. Place in the fridge for at least an 1 hour then place in cupcake liners before serving.

(See its that easy!!)

Enjoy!
Farhana