Holiday Tags

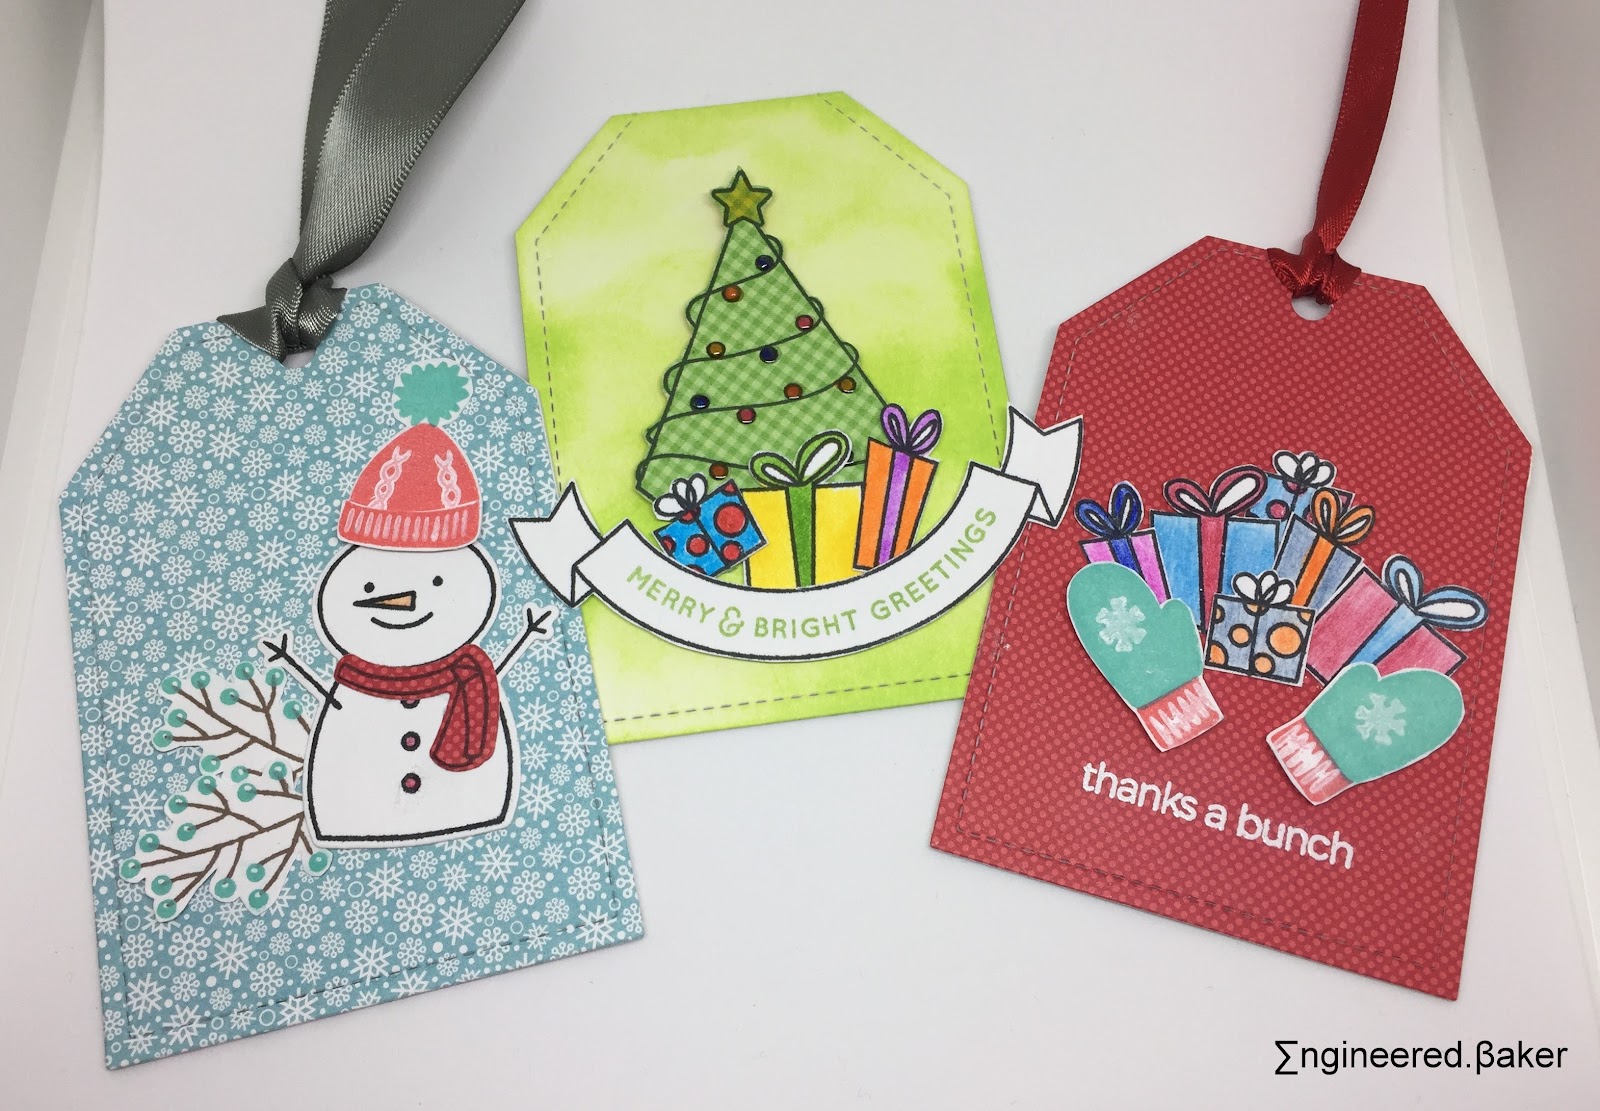
This post was supposed to go up yesterday, but I guess better late than never, right? I have never made holiday cards before I heard of the caring hearts card drive, and it was interesting to try and come up with card designs. But after I got my hands on some winter/holiday stamp sets, the creative juices finally got flowing! And I came up with these tag cards.

What are tag cards you ask, well instead of diecutting just a tag, i used the diecut on a folded notecard with the edge hanging off, so that the top side is not cut off, resulting in a notecard that is shaped like a tag. I punched a hole and added some ribbon so that it can be tied onto a giftbag OR you can leave it as it and put in an envelope.


Details of supplies used are listed at the end of the post.


Supplies used:

  1. Right at Home Stamps // Bits & Pieces: Winter
  2. Pretty Pink Posh // Stitched Duo 1Happy Snowman Stamp SetHappy Snowman Coordinating Dies
  3. Simon Says Stamp // December Card Kit
  4. Impress Cards and Crafts // Fresh Ink
  5. Amazon // Memento Tuxedo Black InkpadGlossy AccentsSolabela Colored Pencils
Happy Crafting!
Farhana   

Don't forget, caring is sharing!
 Facebook | Twitter | Instagram | Pinterest | Google+ | Bloglovin

Holiday Cards for the Caring Hearts Card Drive

Everyday I say I'll start tomorrow, be it blogging, job hunting, organizing or scrapbooking. Then I realized a month later tomorrow hasn't come yet and then I started saying that I will start in the new year, but I was never much of a resolution person, so here I am trying to back into being productive!

These cards should have been shared weeks ago, when I actually made them, but that obviously never happened. I made a stack of these cards for the caring hearts card drive. Luckily I got the card there on time!  So here we are now, hoping that someone needs a last min idea for a holiday card. Good thing, these are super easy to make!

The first card is the simplest, like really you can't get simpler than this.


I used a Hero Arts stamps (cannot find a link to it), I got it in a goodie bag from Impress Cards and Crafts last year. I colored the ornaments in with Spectrum Noir Markers and added some wink of stella and glossy accents. The dies used for matting the card are from Right at Home.


The second card wasn't as simple as I needed to break out the heat gun, but one you have the background done, all that there is left is diecutting!


I diecut the background using a  die from Right at Home. After that I used my misti along with a stamp set from Simon Says Stamp Card Kit (January 2016). I stamped using versamark ink and added white embossing powder. After heat setting it, I used a ink blending tool with mermaid lagoon ink blend color on to the background. While that dried, I diecut the happy holiday from yellow cardstock (die from Impress Cards and Crafts, but can't find it online anymore).


The last card was simpler than the second as the only stamping was the sentiment!


The dies used for matting the card are from Right at Home, the butterfly and flower are from Concord and 9th. The sentiment is cut from a old Simon Says Stamp set, and the watercolor background was created using a mix of distress ink markers and zig clean color markers.


I really hope that these inspire you to create! And you can always change out sentiments and make it work for you!

Happy Crafting!
Farhana   

Don't forget, caring is sharing!
 Facebook | Twitter | Instagram | Pinterest | Google+ | Bloglovin

Stamptember

Every month I say I'm going to blog more regularly, but I end up with zero posts and a ton of excuses and every month I try, try and try again to make creating and sharing a regular thing. Maybe this is the month, maybe it's not, we will find out. On a positive note I have been creating way more than usual. Follow me on snapchat (  ) for a peak into my crafting adventures.


Quick post today, sharing some card created with a stamptember set from Simon Says Stamp. I got lucky as they sent me this set in the mail, and it was the perfect set for me! I love creating birthday cards, cause those are the ones I use the most! Enough chit chat, time for some cards!

First up, the simplest one.


For this card I white heat embossed the solid cake image and added some bling using rhinestones. The sentiment was embossed using silver powder and finished off by adding a few drops of silver glitter nuvo crystal drops.


The next card was a little more detailed as it involved some coloring and die cutting.


After stamping the cupcake images, I colored in them in and added some wink of stella. I finished off a card with a sentiment stamp from the September card kit (awesome set! So glad I got it!!).


And of course I saved my favorite card for last!


Yep, its a little extra work, but I loved the finished look of the window card! The cake is stamped on the inside, and the stand on the outside, I fussy cut those the stand cover, but if you can get the coordinating die cut, you can use that to cut out the window, I also added a layer of acetate between the papers, to complete the look.


Thanks for stopping by and I hope you are as excited as I am for Stamptember! Slowly adding to my wishlist!!

Happy Crafting!
Farhana   

Don't forget, caring is sharing!
 Facebook | Twitter | Instagram | Pinterest | Google+ | Bloglovin

Happy Mail Balloon Card

Are you guys sick of my "Happy Mail" themed cards! Fear not, this is the last one for a while, I have some birthday cards in the making along with some food posts! Hopefully all this blogging high lasts the next few weeks as I am going to be super busy with some out of town guests and weddings!!


This quick and easy card was inspired by this card posted on the Right at Home blog a few days ago, by one of their DTs. Excuse the fact that my sentiment is not straight, baby was going to wake up and I didn't have time to take out my MISTI tool.


This card is so simple to make! Start with stamping the solid envelop from the Happy Mail Year 2 set using the three individual colors from the ombre peach ink pad. Then fussy cut them out, stamp the "balloon strings" using stamps from the stamped and sealed craft box. Add the envelops using some foam squares to add dimension. Finally add the sentiment using the same ombre ink.


I hope you had as much fun as I did hopping along with Right at Home. Thanks again, Nicole for inviting me!

Supplies used:

  1. Right at Home Stamps // Happy Mail
  2. Right at Home Stamps // Happy Mail Year 2
  3. Hero Arts // Ombre Ink - Peach
Happy Crafting!
Farhana   

Don't forget, caring is sharing!

All Purpose Note Card

Another day, another post. If any of your read my last two post then you know by now that I love sentiment stamp sets and dislike coloring. Well today I've got a solution for quick coloring and making card in bulk for any occasion that may come along.


I posted this picture on instagram a while back, but never got the chance to share the cards here on the blog. As I mentioned on my last post I have a thing for sentiment stamps, they just bring any card together! And this set that is pictured from Right at Home is a sure winner! (bragging moment, but the first card I made with this set got featured in Nicole's newsletter!)


My idea behind this card set was to create them in bulk so that I always have some cards in hard, no matter the reason to send out some happy mail! All the cards have the same "a little note to say " stamped on the front, and just before sending a card out, I stamp a sentiment to match!


For both set of cards I used the same technique to color in the images from two floral sets. After stamping with versamark and embossing in white, I used an ink blending tool to color. Quick and simple!


After the coloring was done, I binge watched netflix and went about fussy cutting.


To assemble the cards, I shaded the card front with some blue ink, used small pieces of foam tape to stick the flower and leaves, finishing off with a few sequins and stamped sentiment.


Linking this post up to the Right at Home One Year Celebration Blog Hop, the Simon Says: Anything Goes and Inky Paws Challenge #34 - Summer.

Supplies used:

  1. Right at Home Stamps // Simple Sentiments
  2. Newton's Nook Designs // Love Grows
  3. Lawn Fawn // Flutter By
  4. Hero Arts // Neon Ink Cubes
  5. Pretty Pink Posh // Summer Sequin Mix 6mm
Happy Crafting!
Farhana   

Don't forget, caring is sharing!

Scripted Greeting Cards

Hey there and welcome back! This is another post that I'm linking up to the one year celebration blog hop over at Right at Home. You can find my post for the hop here, and my previously linked posts, here and here. I made these cards a while back, just never got around to sharing them. But there's never any better time than the present, right?


I have a thing for sentiment stamps, they make creating cards so much easier! Especially when your using die cuts, it's great to add that final touch! And Right at Home has some great sentiment stamp sets, best part of this stamp set is that you can add a matching sentiment inside the card.


To create this card I die cut a window inside a rectangular piece of white card stock. Color the square window piece with a blue ink of choice with a blending tool. I then die cut the solid flowers and leaves from colored card stock and the outline was diecut in white.


Layer them up with your favorite adhesive, add them to the blue background and then to the card base. Using versamark ink stamp the scripted greeting to the window frame and emboss with a color of choice, Then add some foam tape to then window frame, layering it on to the card base.


To finish of the card, stamp a matching sentiment inside using your favorite black ink (or another matching ink of your choice).

Supplies used:

  1. Right at Home Stamps // Script Greetings
  2. Mama Elephant // BASIC SET - CREATIVE CUTS
  3. Ellen Hutson // Essentials By Ellen Bold Blossom Stand-Alone Die Set
  4. Ellen Hutson // Essentials By Ellen Bold Blossom Matching Die
  5. MFTs // Die-namics Pierced Rectangle Stax
Happy Crafting!
Farhana   

Don't forget, caring is sharing!

Critters Birthday Card

Once it comes to making cards there is one thing that I suck at really badly! Any guesses? It's coloring. Pretty much anything besides distress inks/markers I totally mess up! But I've recently been trying to get out of my comfort zone and try new techinques, one of them shown in today's cards, coloring and blending with color pencils. I bought a cheaper set of Amazon based on a friend's recommendation. Me likely so far!


For this card I stamped a happy monster party stamp from Denami Designs onto a some pattern paper from Right at Home's Stamped and Sealed Box, along with a sentiment on the outside and inside of the cards. Then I did some simple coloring, added from silly eyes with multi medium matte and finished off with a touch of Wink of Stella Brush.


It's a pretty simple card, but I felt the eyes bring it to life and is prefect of a little one on their special day! 


Happy Mail Shaker Card

Hey there and welcome back! What is this, four days in a row? Wow! Well with all the products I've been hoarding I better be using them and sharing ideas with all of you! Just to enable you to get them of course! This card didn't get finished in time for the one year celebration blog hop over at Right at Home. Details of my post for the blog hop along with some sweetness can be found here.


Even before I made cards myself, I loved choosing out cards to send on birthdays, anniversaries and any other happy occasion I could find! Now I look for even more excuses cause it means I get to make more cards! I don't stop at cards, I love decorating the envelops too, some people find that a waste as it gets thrown away, well so do cards eventually, but it's all about the thought, right?


I think the best type of cards are shaker cards! They are actually pretty simple to make, especially if you have a die cutting machine. But if you don't you can still make them, check out these post hereherehere and here!


Back to the card, for the background I diecut some paper I've been hoarding from My Mind's Eye, stamped the sentiment for the happy mail year 2 set in versa mark ink and heat embossed it in gold. Then die cut a frame from black glitter paper. Lastly for the shaker elements I added some heart confetti, along with a bunch of the envelops heat embossed in gold from both happy mail sets that were then fussy cut. I adhered the die cut frame on to some transparency, then added some double sided foam tape to create dimension and attached it to the background with the shaker elements inside. Lastly stick the background to a notecard, and your all set!


Supplies used:

  1. Right at Home Stamps // Happy Mail
  2. Right at Home Stamps // Happy Mail Year 2
  3. Mama Elephant // BASIC SET - CREATIVE CUTS
  4. Pretty Pink Posh // Scallop Frames
  5. Pretty Pink Posh // Gold Mini Heart Confetti
  6. VersaMark Ink
  7. Gold Embossing Powder
Happy Crafting!
Farhana   

Don't forget, caring is sharing!

Right At Home : One Year Celebration Blog Hop

Welcome to the Right at Home One Year Celebration Blog Hop which also happens to be my first time being a part of a blog hop. Thanks Nicole for inviting me! I had a ton of fun brainstorming and creating with a set of awesome products!


This blog hop is to celebrate the one year anniversary of the first stamp that Nicole designed and released. So how could to not use her happy mail stamp set to create something for this blog hop.


(Side note: card using the new happy mail year 2 stamp set coming soon! Baby was being a little fussy today.)


Back to today's project. As you might have noticed the name of my blog has baker in it. And as a baker I can't come to a party with out cupcakes especially anniversary celebration!


The crafter side of me decided to create some custom wrappers and toppers. And the banner alphabet add on set worked perfectly with the happy mail stamp set to create these fun treats! 


The wrapper were diecut from plain white card stock, at Ben Franklin Crafts and Frames (my local craft store) and can be done at home using this die from Lawn Fawn. I then stamped the large flower, it's matching center and stem on to the diecut wrappers. 


For the toppers, I stamper the sun with the matching smile in the middle, along with a bunch of clouds that I colored in using my wink of Stella pen that I got with my stamped and sealed craft box. Then while taking a break, I fussy all the little elements, and stuck them onto a toothpick.


If your looking to bake and frost your own cupcakes, you can find some recipes here, hereherehere and here


Thanks for stopping by and I hope that you enjoy the rest of the stops on this hop! I'm sure that all the other designers and guests have done an awesome job!

Supplies used:

  1. Right at Home Stamps // Stamped and Sealed Box
  2. Right at Home Stamps // Happy Mail
  3. Right at Home Stamps // Banner Alphabet Add On Set
  4. Impress Cards and Crafts // Fresh Inks (colors used : basil, strawberry, lemonade, island and white paper)
Happy Crafting!
Farhana   

Don't forget, caring is sharing!

Birthday Shaker Cards

yes! I'm back again :) I know it's only been a day and guess what I'm working on another post for tomorrow! Yep three days in a row, wonder how long this is going to last! I did tell you that I have a lot of cards to share and even more ideas of cards to make!


So the story behind making these cards so quickly is the fact that I've been hoarding the dies for a year! I got them at last year from Impress Cards and Crafts annual sale! So when this year's sale weekend rolled around, I figured I should at least try and use some of my dies! Again these cards are super easy and I had them finished in minutes in between chores.


To start the card I created a background mat using a scalloped die, then diecut the sentiment frame from some coordinating card stock. To create the shaker element, I die cut the same frame sentiment from craft foam in a similar color. Using a small pair of scissors I removed the sentiment from the foam leaving only the outline border. Then using your favorite adhesive stack up the sentiment, foam frame and transparency. Fill it with sequins and attach it to the background mat. Stick the whole thing onto a notecard, add some wink of Stella and start shaking!!


Supplies used:

  1. Right at Home Stamps // Stamped and Sealed Box
  2. Impress Cards and Crafts // STITCHED HAPPY BIRTHDAY CIRCLE FRAME
  3. Impress Cards and Crafts // Birthday Die (Impress exclusive from Memory Box) [no longer available) 
  4. Mama Elephant // BASIC SET - CREATIVE CUTS
Be sure to come back on tomorrow for a fun post that's part of a blog hop!
Happy Crafting!
Farhana   

Don't forget, caring is sharing!

5 minute Birthday Cards

Yes I'm back at blogging, everyday I wake up thinking today is the day I'm going to write a post. But somehow after chores are done and I've run errands, I use the little me time I get to craft, and the to blog pile gets bigger. So many cards to share with you, just not enough time!!


Enough time spent complaining, let's get to the point! Typing this post and taking/editing pictures probably took more time then actually making the cards! That's before Nicole from Right at Home put together an awesome kit to easily create stacks of birthday cards! I've got a few more detailed cards ready to be shared in the coming days, but for now here are a set of super easy cards with minimal stamping. You can actually leave out the stamping altogether, I just wanted to use the set that came with the kit and love adding a little sentiment inside my cards.


For each card I diecut a background mat, along with some frames. Then I looked for images in the paper stack that worked with the diecut frames, trimmed them and glued them on to the mat along with some sequins (also from the kit) and a touch of wink of stella (hard to photograph) to complete the card.

Supplies used:

  1. Right at Home Stamps // Stamped and Sealed Box
  2. Pretty Pink Posh // Photo Frames
  3. Doodlebug Designs // Sunkissed 6x6 paper pack
  4. Mama Elephant // BASIC SET - CREATIVE CUTS
  5. Memento Ink(Tuxedo Black)
Be sure to come back on Thursday for a fun post that's part of a blog hop!
Happy Crafting!
Farhana   

Don't forget, caring is sharing!