#footballsunday 12.0 : Seahawks "Away" Manicure

I was looking through my nail polishes (I have a huge collection, totally obsessed!) And the grey and silver ones caught my eye and I thought why not do a manicure matching the Seahawks away kit.


With the Sounders and Seahawks playing this is going to be a short post. I already have two screens to watch, not adding a third screen :) In other news my Seahawks post match the NFL week count, finally caught up :)


Here's the colours I used to create this look:


All of the colors are discontinued at the stores. But all you need is a tip painter in white, a solid grey and white, silver and blue glitter. Along with your favorite base and top coat.

Share your Seahawks manicures on instagram and tag me, I'd love to see your ideas! (@hanasarker)

Go Hawks!
Farhana


#footballsunday 11.0 : Seahawks at Ben Franklin

If you know me, you know my obsession with Ben Franklin Craft and Frames. Recently I've shared some football/Seahawk themed crafts and treats on the blog, and most of my supplies are from Ben Franklin, and today I am sharing a few snaps of their display dedicated solely to the Seahawks!!


How cute is that tulle skirt! If I were younger I might just have made one for myself! 
Instructions for the pom poms can be found here, banner here and the tulle skirt here.


Lots of bling and flair to add to your game day look. Those scarves will be super useful on windy game days!


Not all that crafty? Oh well you can just buy these ready made ones!


I always have trouble making cards for guys, this is a quick and easy one perfect for any guys of any age.


They have tons of paper and stickers to make cards and scrapbook pages of those games day pictures!


Ahhh...they have baking stuff too! Useful to recreate some of these treats.


Throwing a party with all those treats you made, well there are tons of straws, doilies and streamers to decorate with!


If you do throw a party, don't let your guests leave empty handed! Make some party favors and pack them up in these pretty DIY boxes with cute seahawks ribbon!

Go Hawks!
Farhana 

Throwback Thursday 2.0 : The "Race Track" Cake

I'm back with another blast from the past. For some reason I still remember the time my mom asked me to make this cake, it was right before finals week and I really wasn't interested in decorating a cake (yes! I have those days too.)


So, I decided to take the easy way out and used this magazine clipping as inspiration. Yes, I still have the clipping too! Trust me I'm as surprised as you are :)


You too can recreate a simple cake like this within a few minutes too!


Details of the cake:
- 10 inch circle cake
- topped with chocolate frosting
- "tracks" piped with white frosting
- "grass" is coconut flakes tinted green with food color
- lastly the "rocks" are m n m's


Enjoy!
Farhana

The PSL Cookie {and a Book Review}

How many cookie cutters do I have? Well I haven't bothered counting, lets just say that I have too many and my collection is ever growing! My friend JUST sent me a care package full of cookie cutters!


One day I decided to start using cookie cutters from my collection and not just hoarding them. And of course I set out to find ideas in the bloggersphere. Which is when I came across Bridget of Bake at 350. She has the cutest and most creative ideas, and using her tutorials I slowly learnt and gained confidence in baking and decorating cookies!


So when I was sent a copy of her latest cookie decorating book, Decorating Cookies Party to review, I was so excited! But given my super busy schedule with school, I skipped the decorating stage, and just used multiple cookie cutters. It was just as much fun baking them! (Note: I did play around with the recipe a tad bit by adding pumpkin emulsion, cause how could I not!)


Each and everyone of her cookie designs are awesome and the tutorials are so easy to follow, that you can recreate them very easily! I had to take a snap of the football cookies, cause we all know my about my obsession with football.


And with a little modification, wouldn't these cookies be perfect for the upcoming release of Mocking Jay!


I'm so excited about winter break coming up and being able to spend more time in the kitchen baking and decorating!


The PSL Cookies
Recipe adapted from Decorating Cookies Party, by Bridget of Bake at 350

Ingredients
3 cups all purpose flour
2 tsp baking powder
1/2 tsp cinnamon
1/4 tsp ginger
1/8 tsp nutmeg
1/8 tsp all spice
1/8 tsp cloves
1 cup unsalted butter, cold and cut into chucks
1 cup (packed) light brown sugar
1 egg
1 tsp pumpkin emulsion

Method
1. Prepare 2-3 cookie sheets by lining them with parchment paper (don't use wax paper, there is a difference!)
2. Add the butter chucks to a large mixer bowl and beat in the sugar, till it is a smooth mixture.
3. Add the egg and pumpkin emulsion to the mixture and beat for 1-2 mins, scraping the bowl when done.
4. Finally add the flour, baking powder and spices. Beat until just combined.
5. Roll out between two sheets of wax paper and cut using cutter of your choice. Transfer to prepared cookie sheet.
6. Once a cookie sheet to full, place it in the freezer for 10-15 mins (this ensures that the cookie maintain their shape while baking).
7. Preheat the oven to 350*F and bake each tray for 10-12 mins (time varies depending on oven and how long the tray was in the freezer).
8. Decorate if you wish or enjoy immediately!

Enjoy!
Farhana  

The PSL Cupcakes

PSL = Pumpkin Spice Latte. I don't the like the drink. I don't look forward to it being available.  I don't wish it was available all year around. I love my summer drinks a bit too much, I actually make milkshakes in winter.


Even though I'm a PSL hater, I don't mind fall coming along. I do miss summer, especially the awesome PNW summer. But fall means that its football season, time to start training for snowboarding and PUMPKIN baking season! Except for pumpkin pie, I am obsessed about all other pumpkin desserts out there!


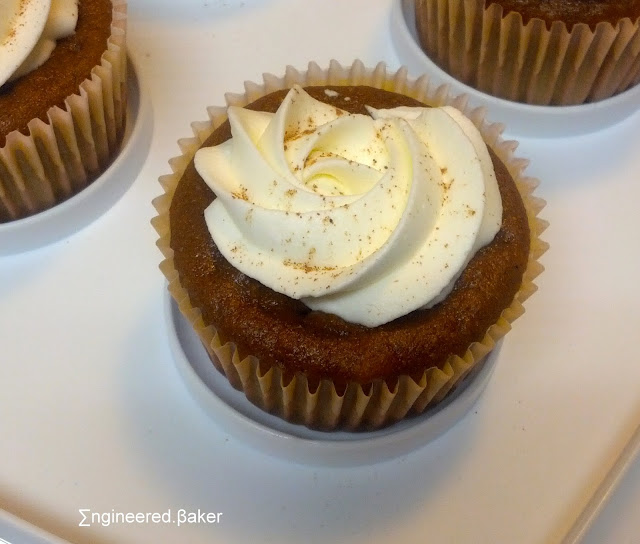
These PSL cupcakes are a favorite as they are so easy to make (using a cake mix) but you can't really tell because of the pumpkin puree that is added along with the spice mix. As a result the cupcakes are the right amount of moist, spicy and sweet. Topped with a little whipped cream and a sprinkle of cinnamon. they are perfect to compliment any fall gathering!


So go ahead, bake a batch, entertain and share. I recommend sharing as this recipe makes 24 cupcakes, that's a lot when we are only two in the house!


The PSL Cupcakes
Recipe adapted from Ericas Sweet Tooth

Ingredients
1 box yellow cake mix
1 cup canned pumpkin puree
1/2 cup water
3 Tbsp coffee
1/3 cup oil
4 eggs
1 1/2 tsp pumpkin pie spice

2 cups heavy whipping cream, chilled
1/2 cup powdered sugar
ground cinnamon, for sprinkling

Method
1. Preheat oven to 350*F and line a regular size cupcake pan.
2. In a small bowl or mug, mix the coffee into the water.
3. Mix the rest of the ingredients, except the whipping cream and powder sugar, in a large bowl with an electric mixer. Add in the coffee mix.
4. Using an ice cream scoop, fill the cupcake liners 2/3 way. Bake for about 20 mins, until a toothpick comes out clean.
5. Cool the cupcakes on a wire rack, in the mean while beat the whipping cream and sugar until stiff.
6. Pipe the cupcakes with whipped cream and sprinkle a bit of cinnamon.

Enjoy!
Farhana 
#craftingnotcoding: The Layered Circle Card

Oh Boy! Its been a while since I've blogged about card making, well I guess that makes sense seeing as I haven't been crafting a lot lately. Between entertaining, job hunting and working on my class project, I really haven't had all that much time to be creative. That is why I cannot wait for winter break! I have so many idea floating in my head that need to be shared.


This card is something I learnt to make at my first Crafty Card Club with Rachel and I just has to recreate it!

Here's what you need: 


- 1 8 x 11.5 sheet of card stock
- paper trimmer
- double sided tape
- small scissors
- 1.5 inch circles from scrapbook paper (I used the die cuts at Ben Franklin Crafts and Frames)

What to do: 
1. Cut the card stock into half, lengthwise. Then score the card stock, leaving about 1/2 inch difference.
2. Put a strip of tape on the shorter edge of card stock. Stick a circle on to the tape.


3. Continue to stick circles onto the card until you reach the end. Trim the last circle so it doesn't over lap.


4. Continue to layer circles, this time by adding small pieces on tape to the individual cut outs, that way it won't show through the gaps. After each line is done, trim the edge. On the final layer you will need to trim the top edge too.


Happy Crafting!
Farhana  

#footballsunday 10.0 : Spinach and Artichoke Dip

We might have lost, but I have a tasty comfort food coming your way to make you feel better! I should have gotten this post out earlier today, but instead of blogging while watching the game, I was studying for an interview and then headed out to a craft class right after (details on this later!). But we all know that all work and no play made Jack a dull boy, so I'm taking a break :)


I had spinach artichoke dip years ago before I even knew what an artichoke was. Then we had it together at a restaurant over the summer and since then its become a favorite and I look for an excuse to make it any chance I get! Appetizers? I got you covered!


I enjoyed making it in my new iron skillet (thanks LL!) but I before I had it I made it in a regular fry pan and it was just as tasty. The crab meat is of course optional and can easily be omitted if you have vegetarian guests. I do not do vegan, so lets not go there :P


This recipe was also shared by a friend (I love it when friends share recipe :) ) and is very easily customization, you can adjust spice and cheese level to your taste. So put all the ingredients on your shopping list and make it for next week's game! Serve it with blue chips and you have a blue and green treat to share.  


Spinach and Artichoke Dip

Ingredients
2-3 Tbsp olive oil
1 medium onion, chopped
3-4 cloves garlic, chopped
1/2 bell pepper, chopped
16 oz crab meat
4 Tbsp chopped basil
chili flakes, optional
salt and pepper, to taste
14 oz can of artichoke, drained and chopped
2 x 10 oz frozen spinach, thawed
1 cup vegetable stock
1/2 cup whipping cream
8 oz Italian cheese mix

Method
1. Heat up the olive oil in a large frying pan/iron skillet. Add onions and garlic. Stir until onions are transparent.
2. Add bell peppers and fry for 3-4 mins.
3. Add in crab meat along with spices (basil, chili flake, salt and pepper).
4. Once the crab meat starts to brown add the artichoke.
5. Add in spinach and stir well.
6. Add vegetable stock and whipping cream, allow mixture to come to a boil.
7. Finally, add the cheese and stir well to mix it in.
8. Once the cheese melts, your ready to serve!

(goes well with tortilla chips, pita bread or toasted french bread)

Go Hawks!
Farhana 

#footballsunday 9.0 : Seahawks vs Cowboys Game

I've been wanted to share these pictures with all of you for a while, but just couldn't choose which ones to post from the 100+ pictures that I ended up taking at the game. When you team is losing you have to find a way to entertain yourself :( So today's post is a mash up of Throwback Thursday and Thursday Night Football (whose excited for the thanksgiving game!!).


I'm no pro at taking pictures, but I finally decided to start using my fancy zoom lens. So Enjoy the few "good" shots! Probably the closest I'll get to these players :D


Go Hawks!
Farhana 

#footballsunday 8.0 : Seahawks Blue and Green Marble Bundt Cake

So today's game is at 1:25PM with means that you still have enough time to make this quick and easy Seahawk dessert. Its just a fancied up bundt cake!


I love the fact that bundt cakes can be made fancy with out adding a pile of frosting, which means that they are in your mouth to enjoy in a few minutes after coming out of the oven!


Not a Seahawks fan? Oh well, then you'll just have to change the colors out to your teams colors. You can also change the color to match that of your party theme too for any other occasion.


By the way, my blue sanding sugar pictured purple, I clearly need to learn to use my camera!

Seahawks Blue and Green Marble Bundt Cake

Ingredients
vanilla Bundt cake
blue and green food color (I use americolor)
2 cups powdered sugar, sifted
2-3 Tbsp whole milk
blue and green sanding sugar

Method
1.Prepare the cake batter as described, then pour half the batter into greased bundt pan.
2. Tint half of the remaining batter green and the other half blue. Pour the tinted batter into the cake pan and swirl with a toothpick.
3. Bake for 45-55 mins until the cake comes of the edges of the pan or a toothpick comes out clean.
4. While the cake cools on a wire rack, mix the powdered sugar and milk together until pasty, adding the milk slowly to make the glaze.
5. Pour the glaze and sprinkle with sanding sugar.

(Feel free to leave out the glaze if you are not a fan :) )

Go Hawks!
Farhana