The "Eid" Fondant Cupcake Toppers

A super late Ramadan Mubarak to all of you. You would think with all the free time that I have, I would be able to blog more regularly. Seems not! With my parents in town and awesome weather, I've been having a hard time getting into the kitchen and sitting down at my craft table, but once I got With a Spin's cookie cutters, I couldn't wait to get to the kitchen quick enough! (I would run to my craft table, but that is a huge mess, so craft projects have to wait :) )


Lail designed the cutest cookie cutters and was kind enough to send me a set to play with! I am so glad that I came across her blog and also got to met her too! 


Ramadan is my favorite time of the year, all the family time, sitting down for meals together, shopping and crafting for Eid and most of all making all kinds of themed goodies! Stay tuned as cookies are coming your way, but in the meanwhile enjoy these fondant cupcake toppers. 


I was not a fan of fondant, but after I started playing with it a while back, I came to like it. There is quite a bit of fun stuff that you can do with it. Remember the "12" cupcake toppers, whose excited about Football season coming up, but till then I have Eid goodies to keep me busy :)


The best part of fondant toppers is that you can make them way ahead of time and if you get busy, then you can just add them to store bought cupcakes at the last minute!


Did you see the mistake I made with the "Mubarak". I only noticed while I was taking the pictures, and didn't want to go back and start again. Plus its okay if everything is not perfect!


FYI : With a Spin is offering free shipping till 4th July in the USA.

Eid Fondant Cupcake

Ingredients
white fondant
fondant roller with 1/8th inch markers
With a Spin's star and crescent cookie cutter
red food marker
message cookie cutter
wax paper

Method

  1.  Roll out the fondant to 1/8th inch thick and cut it out using the star and crescent cutters.
  2. Spell out "Eid" and stamp the star cutouts and "Mubarak" on the crescent, just make sure to stamp it the right way! 
  3. Let the cutouts air dry on wax paper for a couple of hours, then highlight the text with a food marker.
Enjoy!
Farhana
Don't forget, caring is sharing!

Theme Week 2 : Day 2 of Father's Day Cards

Welcome back and thanks for coming back! I am really sorry about the irregular blogging schedule. I'm just enjoying my summer break with my parents and having a hard time sitting down to craft and blog! Maybe with Ramadan starting I might go out less and stay inside and craft :)


Another set of easy peasy cards today! As I mentioned yesterday, I was sent two sets from Newton's Nook Design and Jane's Doodles. But I also made a card not using a stamp, just in case the stamp set you order doesn't get to you in time!


Have you gotten your fingers inky with Hero Arts Ombre Inks yet? That's the ink pad you need for this card!


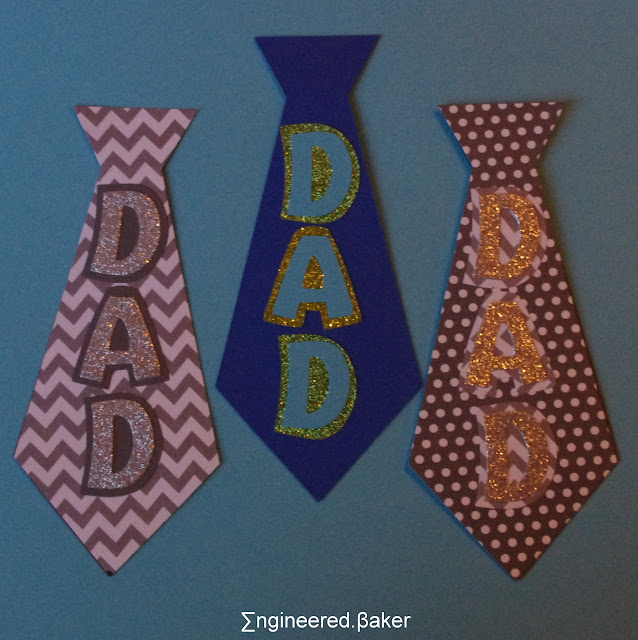
For the next card I decided to give paper piecing a try! Just stamped on printed paper from Lawn Fawn with memento tuxedo black ink and fussy cut.


The "dad" stamp was also thin enough to use with a single ink on the ombre pad, I used the navy to pool pad. I love finding multiple ways to use the same product!


And for the last card, no stamping necessary! You cannot make a simpler card :)


The background tie paper and the die cuts (2 inch shout letters) are from Ben Franklin crafts and frames.

Thanks for checking out my post!! I'll be back hopefully soon to share another set of cards!

Day 1 cards : here

 Happy Crafting!
Farhana   

Don't forget, caring is sharing!

Theme Week 2 : Day 1 of Father's Day Cards

Welcome back to theme week! This time it's all about Father's Day! Which I must say was quite a challenge, I literally just started making/designing cards last night! I was having too much enjoying graduation weekend! Now trying to get back into the flow of things with loads of laundry and vacuuming, hopefully A LOT more blogging! Lots of products to share with all of you :D


As I mentioned before making "dad" cards is not an easy task, but I got help from Newton's Nook Design and Jane's Doodles. They were nice enough to send me some of there "guy" sets. So excited to play with them!


How cute are these sets?


Hopefully the next few cards that I make are a little more creative, but today I kept it super simple, a little die cutting and almost no stamping! 


As always the die cuts are from Ben Franklin Cards and Crafts, I used the 1 and 1/2 inch letters and J166 for the ties.


The insides were stamped with the sentiment from Newton's Nook Design and mustache from Jane's Doodles.


Make sure to follow along (via email on the right side!) to get updates for more posts! Going to try and make some more creative cards to share!! 

 Happy Crafting!
Farhana   

Don't forget, caring is sharing!

The Chocolate (Graduation Cap) Cookies {and a Book Review}

Done with my take home exam! Last exam for a long long long time! Submitted it and headed straight to the nail salon for some alone me time :D Then it was back to the daily activities! Had a pretty productive day doing chores and running errands all in preparation for my parents coming to and entertaining over graduation weekend.


And being the baker in the family, and a snobby baker at that I end up baking most of the desserts for all celebrations! So I'm of course I had to bake something for myself too. Sounds pretty lame, but it was nice to be back in the kitchen and baking again. Its been so long!


So long that I almost forgot that I didn't share this great cookie book. There couldn't be a better book out there to show you how to "stretch your cookie cutters". This book may actually help me to buy less cookie cutters! We'll see!


With all that I have to get done before the weekend, I went really simple with the cookies, just cut them using my graduation cap cookie cutter and then piped a tassel on to it using some melted chocolate (orange because my tassel is orange :D)


Chocolate cookies are little tricky to bake as it is hard to tell when the edges brown, so keep an eye on them while they are in the oven!


I also like to chill my cookie dough and cookie sheet to reduce the dough from spreading and help retain the shape of the cutter.


I have one more thing to get done before I can graduate, and I'm off to finish to my last presentation, 2ish days to go!


The Chocolate Cookie
Recipe Adapted from You Can't Judge a Cookie by Its Cutter

Ingredients
3 cups all purpose flour
1 tsp baking powder
1 cup (2 sticks) butter, at room temperature
1 1/2 cups plus 3 Tbsp granulated sugar
1/2 cup plus 2 Tbsp unsweetened cocoa powder
2 large eggs
2 Tbsp vanilla extract

Method

  1. Sift the flour and baking powder together and set aside.
  2. Beat the butter and sugar together with an electric mixer until the mixture is a pale yellow. Add in the cocoa powder and continue beating until completely incorporated.
  3. Add the eggs, one at a time and mix till just combined, then add in the vanilla extract.
  4. Finally, add the flour mixture and continue beating until well mixed.
  5. Chill the dough while preheating the oven to 350*F.
  6. Roll the dough to 1/4 inch thick and cut to desired shapes.
  7. Bake for 8-10 mins on a baking sheet lined with parchment paper.
  8. Cool the cookies on the sheet for 5 mins before removing to a wire sheet.
  9. Decorate as desired :)

Enjoy!
Farhana

Don't forget, caring is sharing!

The Chocolate Chip Cookie Pizza

What a baking recipe? Yes! What happened to this baking blog? School happened! Hopefully starting next week I will have time to bake more and share more!! Today's recipe is a super easy, short cut recipe that you can make for your graduating friend or family this coming weekend or summer!


The original recipe was topped with Nutella and lots of candy, but while I was baking it, I realized that adults don't appreciate a sugar overload as much as kids and decided to tone it down with a little bit of melted chocolate and sprinkles!


My classmate and friend is the one that introduced me to the world of cookie pizza's and there was no turning back! The combinations are limitless as are the flavors. Plus when your short of time you can always short cut with cake mix!


My friend made her signature fruit pizza when she had us over to celebrate her graduation, here's my take on it if you want to try it sometime! I'm going back to the grind, if you try the recipe, leave me a comment!

The Chocolate Chip Cookie Pizza
Recipe Adapted from Todays Mama

Ingredients
for Pizza base
1 box yellow cake mix
1/2 cup canola oil
2 eggs
1 cup semi sweet chocolate chips

for Decorating
chocolate candy melts
sprinkles

Method
  1. Preheat the oven to 350*F and grease a 12 inch pizza pan.
  2. In a mixing bowl combine all the ingredients except the chocolate chips. Mix until just combined. Then fold in the chocolate chips.
  3. Spread and flatten the batter on to the prepared pan. Bake for 10-15 mins. 
  4. When the cookie is cool, melt the candy melts and pipe it on to the cookie and add sprinkles if desired.
See that easy! But if you are serving it too kids, you can always cover it with Nutella or chocolate frosting and top with as many types of candy as you want!

Enjoy!
Farhana

Don't forget, caring is sharing!

Sparkle and Shine : Challenge 7

For the first time in a long time I am actually okay that today is a Monday. My class was canceled and I just have my take home left to do and  my final presentation and then its time to PARTY! And blog! I have a ton of fun posts coming up featuring lots of new products that I have gotten my hands on, but are still in their original packaging!


I thought that I would pop in and share some card ideas while I took a break! In between studying I made a few cards using the Sparkle and Shine Challenge photo as inspiration. I didn't know which one I liked best, so I'm posting all of them and you can chose. I did my usual minimum product usage, sticking to one stamp set and a few markers and inks.


I ended up using mainly watercolors, so I decided to link up to the Pretty Pink Posh Watercolor Blog Hop too, especially after my last post got so much attention, thank you all for commenting! I will get back to you personally as soon as I am done with school!


As I mentioned I used a limited list of supplies:

  • Lawn Fawn's Blissful Botanicals
  • Distress Markers in cracked pistachio, mermaid lagoon, peacock feathers, picked raspberry, abandoned coral, ripe persimmon and mowed lawn. 
  • Watercolor paper
  • VersaMark Ink, embossing powder, heat gun, fussy cutting scissors and PPP sequins


For the first card I created a background by stamping and embossing with white powder, when "painting" it and creating an ombre effect.


To finish off I added a die cut sentiment from Ben Franklin (#567), cut from a glitter paper and added a few PPP sequins.


The next card was a little bit more work, I used the butterfly stamp from the set in versamark ink and embossed with a shade of blue powders. Then I used a waterbrush pen to color it in and yet again create an ombre effect. And then fussy cut!


After sticking the butterfly to the cardbase using 3M foam tape, I used multi medium matte to add a few sequins to add a little sparkle!


Save the best for last, right? This one used a little bit more color and a lot more fussy cutting! I stamped a lot of the flowers and leaves with versamark ink and embossed with gold powder and then colored them using a waterbrush pen and distress markers, The background was created similar to the first card.


Once the fussy cutting was done, I adhered to the flowers using 3M foam tape and sequins using multi medium matte. While typing this I realized that I didn't had a sentiment, but I guess now I can use it for any occasion!

Thanks for joining me today! Back to the grind, 5 days till I'm done :)

 Happy Crafting!
Farhana 

Don't forget, caring is sharing!

Watercolor Blog Hop with Pretty Pink Posh

Yay! Its Friday, it's sunny and I have plans with a girlfriend to go shopping and hang out at the craft store! Could not ask for a better way to start the last weekend of my graduate program (fingers crossed!) I do have to study for my final and wrap up my project, but we'll get to that! First time for the Watercolor Blog Hop hosted by Pretty Pink Posh


I'm not big on watercolors, well more like I don't really get watercolors. Probably because to don't use them as much, and practice needs perfect, right? So last weekend I decided that school work was getting overwhelming and took a break a created some cards with all the watercolors that I have been hoarding. And of course Pretty Pink Posh's watercolor blog hop was inspirational. 


In an effort to not make a huge mess, I used one stamp set, Flutter By from Lawn Fawn, a few inks and my watercolors (distress markers, Tombow markers and Pearlescent Watercolor).

Let's start with the simplest card first. 


This next card was not at all difficult but cutting acetate was a little tricky!

  
Supplies used : Pearlescent WatercolorStazon Black inkPPP 4mm Spring Mix and acetate.


This next card was my first successful card using Tombow markers!


Save the best of last, right? This was my favorite card and probably took the longest as I was attempting "shading" using distress markers.


Supplies used : distress markersStazon Black inkPPP 4mm and 6mm Spring Mix and Impress "thank you" stamp.


And that's a wrap for my watercolor cards! Please leave me a comment if you need more details on techniques or supplies used, with all that I have to do, I didn't have the time to type up "how to's" for each card :(

 Happy Crafting!
Farhana 

Don't forget, caring is sharing!