I have lived in A LOT of place growing up, but if you ask me about having gone to touristy place locallly, 95% chance I haven't gone. So this summer I bought us Seattle City Passes. If you really want to explore the city, this is the way too go! I am actually planning on getting my parents these passes when they come to visit this summer (hopefully the weather will be more cooperative then the last time they visited!). Also once my friends and family come and visit, you'll get passes too!!
So here's what you get for $64 you get admission to the following places :
FYI : you can actually go up the space needle twice AND the passes can be purchased a year in advance and used over 9 days! So if you are touring with a larger crowd, no need to rush it, just go back another day. We choose to stick to the city as we had already been to the Museum of Flight and I wanted to go to the EMP Museum. We used our passes over two weekends, and I'm glad we did, cause my legs were SORE after the first day. BUT the amazing Vietnamese food to end the day made me forget all the walking :).
Okay, enough facts and chitchat...let's get to the pictures!!
Day 1 :
We took the bus into the city so that we didn't have to worry about parking and moving the car around the city. We started with the EMP Museum, cause its indoors and we wanted the weather to clear out a bit before heading up the space needle. They had a Lego exhibit, more formally know as "block by block", where they recreated numerous landmark buildings (to scale) from around the world with lego block. They had the Space Needle (of course!), the clock tower in Makkah and the World Trade center to mention a few. Made me want to start playing with Legos again!


They also had a Fantasy exhibit with memorabilia from all the well known stories like Harry Potter, Game of Thrones (am yet to watch that!) that I can remember now, pictures were harder to take in this section cause of the bad lighting.


They had a few music exhibits (Music Museum after all!) that didn't really catch my eye, as I'm not really into music, there was one last science fiction display. This one had random stuff from sci-fi movies going back year! Star Trek, Ender's Game, Star Wars, you get the point :)

After grabbing a light lunch we headed up the Space Needle, cause the clouds had cleared up the best that it would. The view were still amazing, but personally I would still recommend the Columbia tower as it is higher up and much cheaper! BTW you can actually feel the viewing area rotate if you pay attention.


Next stop was a walk through Pike Place on the way to the Aquarium. We both had been to the aquarium as few weeks before for a wedding, so we didn't pay attention to any of the displays except the Octopus, creepy yet interesting at the same time!

Next up we boarded the Harbor cruise with a starbucks drink in hand (of course!) and sat down to enjoy the view! (on a side note, I sometime get seasick, but this cruise boat was pretty steady and I didn't any problems).


From the cruise we noticed that there was a Mexican Navy Ship docked on the pier, so we walked over and went on board, it was an interesting experience!


The night ended with really tasty Vietnamese food at Long. Awesome place, just too bad that it's in Seattle or I would be going there more often! Since I haven't done a Foodie Friday post in a while, I though might as well add it in here (not that the post isn't long enough!)

So here's what you get for $64 you get admission to the following places :
1. Space Needle
4. EMP Museum OR Woodland Zoo
FYI : you can actually go up the space needle twice AND the passes can be purchased a year in advance and used over 9 days! So if you are touring with a larger crowd, no need to rush it, just go back another day. We choose to stick to the city as we had already been to the Museum of Flight and I wanted to go to the EMP Museum. We used our passes over two weekends, and I'm glad we did, cause my legs were SORE after the first day. BUT the amazing Vietnamese food to end the day made me forget all the walking :).
Okay, enough facts and chitchat...let's get to the pictures!!
Day 1 :
We took the bus into the city so that we didn't have to worry about parking and moving the car around the city. We started with the EMP Museum, cause its indoors and we wanted the weather to clear out a bit before heading up the space needle. They had a Lego exhibit, more formally know as "block by block", where they recreated numerous landmark buildings (to scale) from around the world with lego block. They had the Space Needle (of course!), the clock tower in Makkah and the World Trade center to mention a few. Made me want to start playing with Legos again!
They also had a Fantasy exhibit with memorabilia from all the well known stories like Harry Potter, Game of Thrones (am yet to watch that!) that I can remember now, pictures were harder to take in this section cause of the bad lighting.
They had a few music exhibits (Music Museum after all!) that didn't really catch my eye, as I'm not really into music, there was one last science fiction display. This one had random stuff from sci-fi movies going back year! Star Trek, Ender's Game, Star Wars, you get the point :)
After grabbing a light lunch we headed up the Space Needle, cause the clouds had cleared up the best that it would. The view were still amazing, but personally I would still recommend the Columbia tower as it is higher up and much cheaper! BTW you can actually feel the viewing area rotate if you pay attention.
Next stop was a walk through Pike Place on the way to the Aquarium. We both had been to the aquarium as few weeks before for a wedding, so we didn't pay attention to any of the displays except the Octopus, creepy yet interesting at the same time!
Next up we boarded the Harbor cruise with a starbucks drink in hand (of course!) and sat down to enjoy the view! (on a side note, I sometime get seasick, but this cruise boat was pretty steady and I didn't any problems).
From the cruise we noticed that there was a Mexican Navy Ship docked on the pier, so we walked over and went on board, it was an interesting experience!
The night ended with really tasty Vietnamese food at Long. Awesome place, just too bad that it's in Seattle or I would be going there more often! Since I haven't done a Foodie Friday post in a while, I though might as well add it in here (not that the post isn't long enough!)
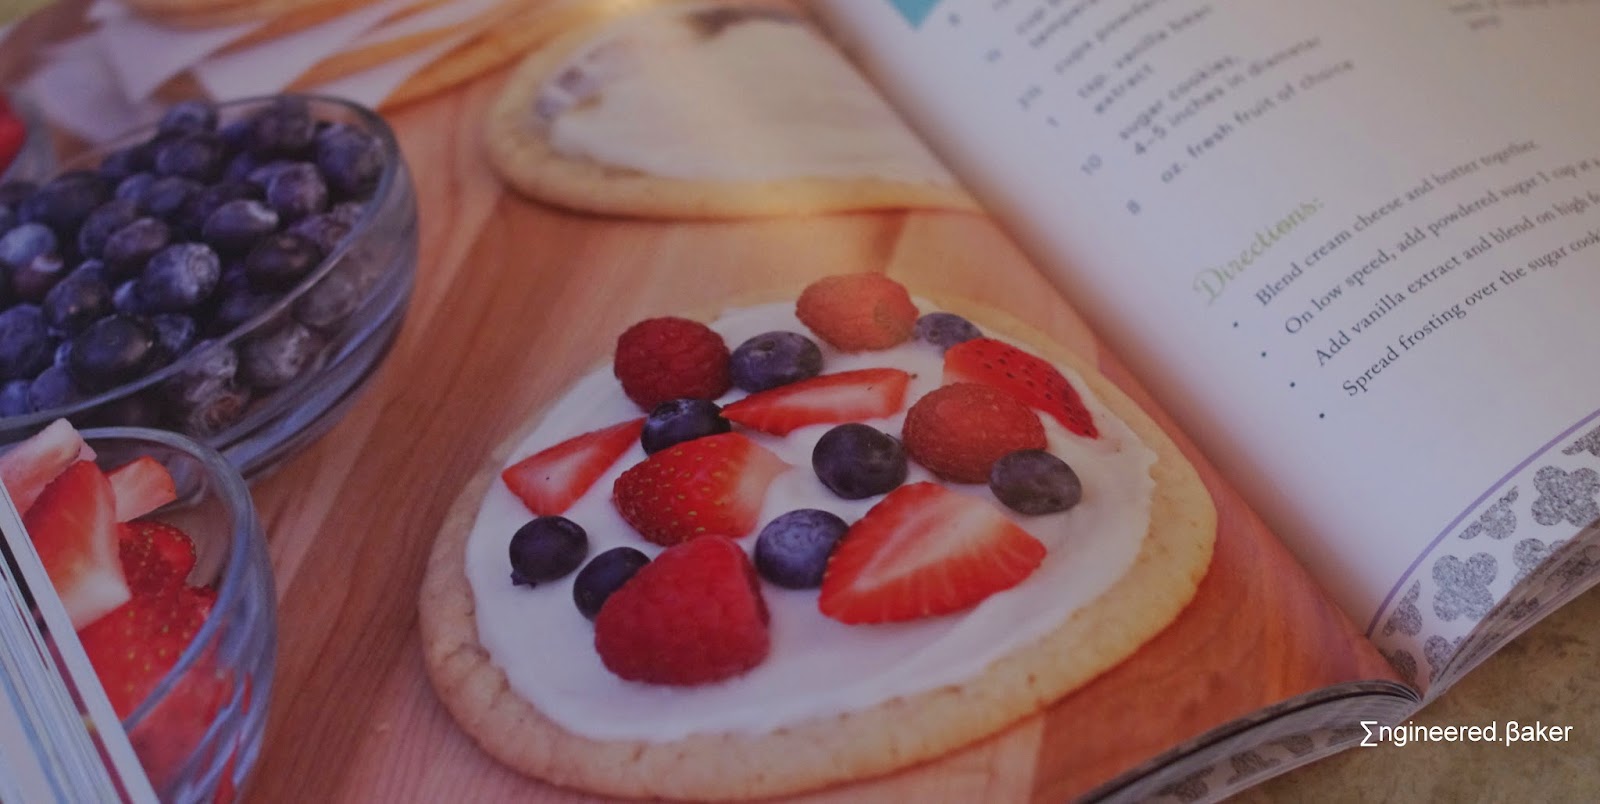
1. Appetizer : Ðậu bắp lụi ~ Okra lemongrass
Fresh okra marinated in lemongrass, onion, garlic, and seasoning served with tamarind sauce.
2. Salad : Gỏi bắp chuối cua lột ~ Soft crab banana blossom salad
Freshly pickled jicama, carrot, fresh shredded banana blossom, roasted peanuts, browned onion, and fresh herbs topped with deep fried soft shell crabs served with tamarind sauce.
3. Entree : Bánh xèo chay ~ Vegetarian crepe
Shiitake mushroom, bean sprouts, mung bean, and tofu in fried rice batter topped with coconut milk served with green vegetable platter and vegetarian soy sauce.
4. Dessert : Bánh nếp chuối nướng ~ Grilled banana cake
Grilled sweet rice and red banana served with warm coconut milk, topped with roasted peanuts.
The following weekend and a day before hiking Mail Box Peak we headed back to Seattle, this time just for a few hours in the afternoon. We started at the Pacific Science Center, and since we had been there previous, we just watched a new IMAX documentary that was showing called Titans of the Ice Age and then walked through the butterfly room, pretty much the only reason I keep going back. If you are local the pacific science center has multiple temporary exhibits that are really interesting, we went to the King Tut exhibit.


3. Entree : Bánh xèo chay ~ Vegetarian crepe
Shiitake mushroom, bean sprouts, mung bean, and tofu in fried rice batter topped with coconut milk served with green vegetable platter and vegetarian soy sauce.
4. Dessert : Bánh nếp chuối nướng ~ Grilled banana cake
Grilled sweet rice and red banana served with warm coconut milk, topped with roasted peanuts.
And that's wrap for Day 1!
Day 2 :
The following weekend and a day before hiking Mail Box Peak we headed back to Seattle, this time just for a few hours in the afternoon. We started at the Pacific Science Center, and since we had been there previous, we just watched a new IMAX documentary that was showing called Titans of the Ice Age and then walked through the butterfly room, pretty much the only reason I keep going back. If you are local the pacific science center has multiple temporary exhibits that are really interesting, we went to the King Tut exhibit.
After the Pacific Science center we headed back up the space needle, and to my delight there was not a cloud in sight! Its really amazing how beautiful the views from Seattle are. So much for all the "it rains all the time" talk. Honestly, its just a gimmick to make sure that everyone doesn't move here and overcrowd the area!
The first time we went up the Space Needle was right after lunch, so I hadn't noticed the little snack shop at the viewing level. But if you get hungry when you are up there, they serve Snoqualmie Ice Cream. We got chocolate (obviously!) and butter pecan, both were awesome!
And that being said, I'm done with this post! This is probably the longest that I have taken to write a post! Choosing out the pictures took at while too! There were just too many :) I really hope that all of you enjoyed reading it and if you are in Seattle I highly recommend you exploring the city, its really amazing!
happy travels!
Farhana