Paper Mania {April}

I thought that I procrastinated last month with my paper mania project! Well this month I topped myself. I literally finished the project minutes before the Paper Mania meeting. Good thing that I am not signed up for Thursday evening, cause I would not have made it. My pictures were actually chosen and printed yesterday!


This month's theme was "daily or summer routine OR use the theme: a day in the life of me". But I didn't really think it out that well and just went with the latest pictures from Memorial Day Weekend. We has family friend's came and visit and we went around Seattle (Pike Place, Seattle Aquarium and the Musuem of Flight). Yes it wasn't all the sunny, but its Seattle after all, and we welcome our guests with a little bit of rain, so that the myth "It always rains in Seattle" does not die out.


This month's kit had a ton of goodies from Doodlebug's Sunkissed line. And its so bright and fun!


This was a last minute layout, so I went with more pictures then embellishments! Not time for fussy cutting, graduation is just days away!


For this layout I used the vintage letters die cut for the letters and the planes are 566 and 97 from the die cut center at Ben Franklin.


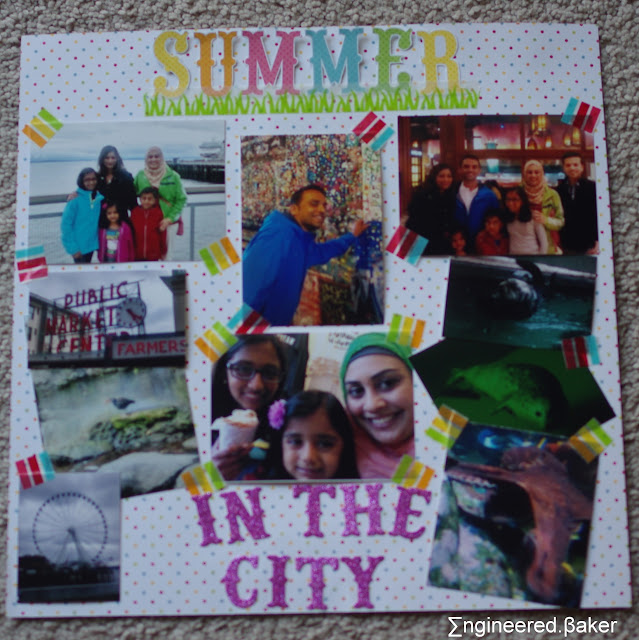
The word "Summer" is this layout is fussy cut from the kit, and stuck on using some washi tape. The pictures were printed as 4x6 but I had made collages before, and cut them using a paper trimmer and stuck them on using washi tape. The "in the city" letters are using the same vintage letters as the previous layout. I am obsessed with them!

I had quite a bit of the kit left, hopefully I will have time to play with them after graduation along with this month's kit.  Exactly 2 weeks to go!!! So excited!!!

Have a great weekend everyone!! I'm going back to coding :)

 Happy Crafting!
Farhana   

Don't forget, caring is sharing!

#craftingnotcoding : Tassel Garland (two ways!)

As I was folding some crepe paper to make a tassel garland yesterday, I realized that I never shared how to make a tassel garland. I keep creating new projects to share and forget to share the old ones.

If you live near a Ben Franklin Crafts and Frames, then you should fold your paper and head over there to make use of the die cutting center to cut the tassels. It is soo much quicker, you'll be done in a blink of an eye, without you hand hurting by the end of it!


Supplies needed are pretty basic :


- tissue paper
- ribbon
- tape
- scissors

What to do:
Whether you use your scissors or a die cut, the first few steps are the same.


A. (1) Fold the paper in half ( used 20 x 20 inch sheets of tissue paper so it didn't matter which way I did it).
     (2) Fold the paper along the longer edge in half, then quarters and finally in eights.
     (3) Lastly, fold the "connected/folded" edge of the paper a quarter way in.


B. If using a scissors, cut the paper into strips (faster if you keep it folded). Cut the strips to the quarter mark that you folded in step A.


C. If you headed over to Ben Franklin to get it done. Then using the die "XCL6", align the paper on the die, letting the quarter mark hang off the edge so it doesn't cut when you run it through the die cutting machine.


D. Keep on cutting until its all done!


E. Then open up the folds (1) and keep rolling all the way (2). Once its all rolled, twist it (3) and then lastly, fold over twist a bit more and add some tape to hold it together (4).


F. Keep rolling and twisting, until you are all done and can string them together!

 Happy Crafting!
Farhana   

Don't forget, caring is sharing!

#craftingnotcoding: Baked with Love

Crafty friends make the best friends. Especially when they send Lawn Fawn sets while you are away on vacation so that you can come home to some happy mail and have a distraction! My friend got me the Baked with Love set, and its like this set was made for me! The baker in me is in love with the set and the crafter in me gets to create baking theme cards.


After playing around with the sets for a while, I finally created card with the stamped images that I fussy cut. Since I cut a ton of the images, I just went ahead and made a trio of cards. You can never have enough cards! You really cannot!


I stamped the images using Memento Tuxedo Black Ink, colored them with Spectrum Noirs and Prisma Color Markers.


If you want to know the exact colors, please leave me a comment and I will get back to you. (This is a short post due to all the HW I have to finish!).


Isn't the set the best! Thanks again for getting it for me, Adeeba!

 Happy Crafting!
Farhana   

Don't forget, caring is sharing!

Sparkle and Shine : Challenge 6

Sometimes you just need to pause life and have some me time. That is what I did yesterday, before meetings, applications and house chores, I crafted. Well, I made a card, a really simple one, but it still gave me a break away from all the craziness that I am having to keep up with...Less than three weeks. I CAN DO THIS.


Okay, back to the card, I created it using this photo inspiration from the Sparkle and Shine Challenge. I recently ventured into the bead section of my favorite craft store, Ben Franklin Craft and Frames and found me some seed beads. They were on sale, so I bought them not having a clue what to do with them, but once I saw the inspiration for this challenge, I knew exactly what to make, a shaker card!


I used stamps from Newton's Nook Designs, Versatile Vases, stamped in memento tuxedo black ink and my Spectrum Noir Pinks and Greens markers to color the flowers in. No shading or fancy stuff, just colored.


To create the shaker mason jar, I fussy cut the inside of the jar very careful, then added a layer of acetate and double layer of 3M foam tape to make sure that the beads will actually shake! The backing for the shaker card is scrap piece of water color paper colored with mermaid lagoon distress marker.


To finish off the card, I added a sentiment from an older set and some washi tape from my mind's eye.

Hope that you all have a wonderful long weekend, I am off to spend it with out of town guests exploring the city!

 Happy Crafting!
Farhana   

Don't forget, caring is sharing!

#craftingnotcoding: Girly-Doily Birthday Banner (and a matching cake!)

We all know my love for banners and its just one more reason for me to hang out at Ben Franklin. I made this banner a while back for my friend's surprise birthday party along with a matching cake. I had to have the cake ready the previous day because we were headed to a Seahawks game that afternoon, as a result I didn't get a chance to take good pictures, and thought that I'll just share it along with the banner :)


This is also a throw back, especially as this is from last October, which was mid quarter meaning that I don't get much time to craft, so this is a really easy banner to put together, you just have to diecut the scallop circles and the letter. I layers doilies in the middle to add some dimension and a girl touch.


To make the banner you'll need to use the 454 die and the 2 inch shout letters. Along with adhesive and matching ribbon.


And before I leave, here is the cake. It was a red velvet with cream cheese frosting. I just tinted some of it purple and pink to match the banner.


 Happy Crafting!
Farhana   

Don't forget, caring is sharing!

Blogger View: Abida from The Red Lychee

Hope that all of you had a good weekend and are all pumped for the week ahead. I sure am as this week is what left between me and a week off from school :D (not that I'll be not doing school stuff, but one less day too commute!). Also looking forward to having an out of town friend over for Memorial Day weekend and catching up with some local friends. School work can wait right :P

Today I got the chance to get to know a little bit more about Adiba, the blogger behind "The Red Lychee". One of the best things about blogging is meeting other bloggers and learning from them. But I get especially excited when meet bloggers with a Bangladeshi background sharing local dishes on their blog.

So then, let's meet Abida!

1. How long have you been blogging?
I started blogging in December 2014, so it has only been about 6 months so far. I'm still a real newbie to the whole thing! 

2. What made you start blogging?
Though I officially started my blog last December, I had been wanting to start one up for a good 2 years before that but kept putting it off due to university commitments and time constraints. I followed a few food bloggers and was always scouring Pinterest for recipes to try out (some more successful than others!), which I would sometimes document on Instagram.

Once I graduated and started working, I felt like I had a little more free time and decided to take the plunge and start my own blog

3. Do you remember your first blog post, if so what was it?
It was a traditional Bangladeshi chicken curry that me and my family would often have as an everyday dinner type meal. I chose that recipe because when I started the blog, I was intending on focusing on traditional Bangladeshi cooking that I picked up from my mother however as the months have gone on, I have tried to experiment with a range of different cuisines, and just sometimes add that Bengali twist.

4. Do you blog full time or is it a hobby?
I currently work as a full time teacher and blog as a hobby during evenings and weekends. My first few months of teaching were difficult and I would often come home tired and pretty much veg out and be completely unproductive. Blogging gave me a creative outlet to focus on in my spare time and meant that I could try and become a better cook and enjoy some good food all at the same time. We all have to eat, why not have some fun doing it too?

5. Who is your favorite blogger?
That's a tough one! Some of the first food blogs that I came across were Ya Salam Cooking and Culinary Couture food blog and I loved their Middle Eastern recipes. I also came across a food blog by Umm Hamza of halalhomecooking.com about 2 or 3 years ago, who was one of the first food bloggers I really spoke to and her blog really inspired me to start one of my own. I also really love Recreatingrecipes.com and maryammakes.com which are respectively a mix of traditional Bangladeshi cooking and some health conscientious cooking.

6. What is your favorite social media?
Though I do have a Instagram and  twitter page for my blog, it has to be Pinterest! I have found so many amazing recipes through there, which never seemed to show up in my Google searches. I have boards dedicated to different world cuisines and I am always telling myself that I am going to make all of the recipes on there!

7. What is your favorite crafting tool?
It has to be a sharpie. It's so versatile and I love to use it for doodling and hand lettering.

8. What is your favorite season or holiday to blog about?
Spring! Though I love making soups in winter, I love the colour and vibrancy of spring. I always feel more inspired to make healthier and creative recipes.

9. Something that you can't live with out?
My faith in Allah. Even when it comes to blogging, my belief in the Almighty is something that has an impact of everything I post.

10. Any words for new and aspiring bloggers? 
Do it! Forget whatever excuses you might have (I don't have the time/camera/technical know how) and just do it. Start off simple and basic so as not to over burden yourself and build yourself up. You will get better with every post and learn something new every day. Stick to a regular routine when posting, even if it is only once a week and focus on quality, not quantity. Try and find bloggers with a similar niche or interests to you and focus on creating good relationships with them.

Though it can be frustrating at times, I thoroughly enjoy blogging and it's so satisfying when someone successfully tries one of your recipe. Starting a blog was definitely one of the best decisions I made this year!

Here are some of Adiba's recipes that I have bookmarked to try out after graduation! 


1. My favorite Bangladeshi dessert, Rosh Malia
2. Bangladeshi meals are incomplete with out a fish dish
3. Who doesn't love Begun Bhorta!
4. This chicken curry recipes remind me of my childhood.
5. Cannot wait to try this salmon recipe!
6. I usually like the potatoes more than the beef in this curry.

Enjoy!
Farhana

Don't forget, caring is sharing!

The Chocolate Fudge Cake

Is this a baking blog? You wouldn't think so with all the crafting that has been happening lately!! Let's just say that crafting is a little bit less messy and time consuming as compare to baking. I have been super busy with school (couple of more weeks to go!), so the blog has had to take a back seat, but don't worry with a summer off ahead I have big dreams for this blog (hopefully everything works!) I am using way too many exclamations, can you sense my excitement about school being over soon.


Enough about me, let's get back to the blog. Today I have a recipe for you. A recipe with a whole lot of chocolate. A lot of chocolate. Its a soft gooey chocolate cake, topped with chocolate fudge. I wasn't a fan of chocolate before getting married, but it has grown on me and now I am the first to get chocolate ice cream.


I say cake, my husband says brownie, either way, this is really easy to bake and serve up. No electric beater needed. No time need to level the cake or bother with smoothing the frosting. Just pour fudge over the cooling cake right in the baking tray. Once its completely cooled slice it up and your ready too go. I added little sugar flowers as a finishing touch.


Writing this post has made want to head over to the kitchen to bake and eat half of this. Too bad I have to finish a paper presentation and programming assignment. Leave me a comment letting me know if your going to try it!

The Chocolate Fudge Cake
Adapted from Glorious Treats
Ingredients
for cake
1/2 cup butter
1 cup sugar
1 tsp vanilla essence
1 1/2 cups Hersey's chocolate syrup
4 eggs
1 cup flour

for frosting
1/2 cup chocolate chips
1/4 cup whipping cream

Method

  1.  Preheat oven to 350*F and grease a 9 x 13 inch pan.
  2. In a heavy bottom saucepan heat the butter and sugar together until melted on medium high.
  3. Remove the pan from the stove, and add the vanilla essence and chocolate syrup, beat until mixed.
  4. Add the eggs and use a whisk to beat it in. Finally add in the flour and mix the batter until the flour is completely incorporated.
  5. Pour the batter into prepared tin and bake for about 20 minutes.
  6. While the cake cools on a wire rack, melt the chocolate chips in a microwave safe bowl and whisk in the whipping cream. Once combined pour the frosting over the cake. Add sprinkles if you wish.
  7. Allow the cake and frosting to cool completely before cutting and serving.

Enjoy!
Farhana

Don't forget, caring is sharing!

Throwback Thursday 7.0 : Mother's Day Cookies

One of the very few fun things of being in school for me is having long weekends, every week! And I am looking forward to a week of next week for Memorial Day. Last year I didn't have classes on Mondays, so Memorial day didn't really make a difference!


The down side of being a student means that there is a very thin line between weekdays and weekends, so weekends unfortunately are not for binge watching Netflix and enjoying the weather. But just four more weeks!


But I got some down time today with a trip to Ben Franklin and being treated to lunch! (My friend LL makes great lox bagels!). Then it was back to the usual chores and errands, before sitting down to read a paper and make some slides for an upcoming presentation. But I really didn't want to go to bed without sharing a #tbt, which is more like a #fbf as its pretty much Friday in most of the world!


These cookies and cake pops are the first of their kind! These pictures are from way back, like before I got married! First set of royal icing cookies and cake pops that I made!


Looking back at the pictures makes me laugh at all the things that I didn't know about baking! Like whipping the royal icing and also using candy melts for cake pops.


But I still love sharing these pictures, because it shows you everyone out there, that you have to start somewhere, and the mistakes you make help with gaining experience and becoming a pro (I'm still working on being a pro!)


I made this for Mother's day and I thought its still appropriate to share them as we are celebrating this weekend! And again in June once my mom gets here :)


I hope these and my other #tbt posts inspire you to get into the kitchen and just try!

Enjoy!
Farhana
Don't forget, caring is sharing!

#craftingnotcoding: The Crafty Card Class [April 2015]

I apologize for the delay in posting the April Crafty Card Set, the past few weeks have been crazy, and a lot of my free time was dedicated to making card for my very first theme week. It was so much fun that I have started thinking about another one for Father's Day! But that will have to wait till I am done with school! Not that I am counting, but its just 4 weeks away :D


Getting back to the cards, April had a really cute collection with a lot of kraft and gold, a combination that I am in love with. Maybe for Eid cards?

Let's get started with some details on the card! First up a birthday card. Once that is not too "flower-y" and can actually be given to a guy! Plus a great why to use your scraps!


This card starts off with kraft card base, and different sized triangles from your scraps. The sentiment here is a sticker, you can easily use a stamp and change it up to meet the occasion you need. Next you need to line up and layer the triangles, and stick them on above and below the sentiment.

Next up is a "circle and twine" card, its a another great way to use up your scarps and a sentiment of choice can easily be added inside.


For this card, you can use a circle punch or die to cut out the circles and then stick when on using foam dots for a bit of dimension (we all now that I love me some dimension!). But if you wish to add the twine, then remember to wrap it around and tie know before attaching the circle to the card base. If your circle is hanging off the edge of the card base, just trim it using a paper of scissors!

I just love this just cause of the golden twine pair with the gold foil paper! And making it could not be easier!


So to make this, cut strips of the golden chevron, glue it down, add the star stickers and finally wrap the twine around the card stock before attaching it to the card base.

This one is such a cute note card and such a creative use of a brown bag (and it has gold polka dots!)


For this, the "envelop" is already made, and for the notecard, layer a kraft sheet with a smaller white cardstock. Add a strip of hello paper at the bottom and a little ribbon notch that will let you pull it out of the envelop.

Save the best for last right? Well in this case, I saved my favorite for the last! One cannot go wrong with washi tape and rhinestones!


To make this card, layer some white card stock on to a colored card base. On the white paper, add strips of washi tape, scatter some rhinestones and add the hello sentiment. This "hello"  is a sticker, but you can also use die cuts.

Hope you enjoyed this month's cards, if you want try it out for your self, call up Ben Franklin and sign up for May's class! There is still time to sign up for tomorrow (May 15th 2015) or walk in and get the kit after :)


 Happy Crafting!
Farhana   

Don't forget, caring is sharing!

Travel Tuesday Vol 4 : Las Vegas Strip (and a bit extra)

Las Vegas really isn't my scene. Honestly, it's off the bucket list and I don't think that I will be going back there, maybe I'll drive past on the way to Zion, cause ZION is INCREDIBLE! Maybe I'll land there to make my way back to the Grand Canyon, but I probably will not be going back to hang out on the strip. Not my thing. That being said, here's my 48 hours in Las Vegas in a few pictures. (Disclaimer: All pictures taken on my (not i) phone and I actually forgot to get pictures at half the hotels that we walked around.)

Any trip that starts with a Mt Rainier sighting is bound to be a wonderful trip.


I'm always up for taking pictures, so before getting into the city we stopped at the Las Vegas welcome sign.


After getting out tickets for the evening shows we had planned and having a tasty lunch (details coming soon!), we headed over to the strip. We started of at the Bellagio, where they had a special display in their Conservatory and Botanical Garden for Chinese New Years. I thought that the statues covered in flowers were eye catching and very creative.


After watching the water fountain music show outside, we started walking the strip, stopping at Caesar's Place and the Venetian before heading to the hotel for a power nap.


After dinner we headed over to the Rio for the Penn and Teller show. Hilarious and a very fun way to spend the evening! But it seems to be a one time thing. My husband was at the show a while before we got married and most of the show was the same 5-ish years later!

The night ended at the top of the Stratosphere (we stayed at the hotel, allowing us to go up the tower as many time as we wanted to!) It was a beautiful clear night, just a tad bit chilly, so we enjoyed the sights from behind the windows :)


Day 2 started at the top of the stratosphere too, if I thought that the night was bad, boy! was I wrong. Sunday morning was chillier and windier and cloudier! So didn't end up getting the best pictures! But the warm and tasty brunch made up for it :)


After having brunch, we drove away from the strip to the Las Vegas Spring Preserves and history museum. I really love history and it was fun to learn about how Vegas came to be! So much history lost in the lights and glamour of the strip!


After the museum we got to watch a parrot show. That was very enlightening and educational. My husband kept asking if I wanted to take a picture with the parrots, I'm a total chicken once it comes to animals of any kind!!


The best part of the spring preserves was the chocolate display! Some how they made the room smell like chocolate which made us really hungry as a result was walking around.


After a short walk around the gardens (it was February so not many flowers to see) and a model no waste future home, we headed back to the strip and started exploring some more hotels before our David Cooperfield magic show.


David Cooperfield was one of the first magicians that I saw as a child and it was wonderful to get to see his show live. Unfortunately as you get older and spend time playing with technology, you learn to figure out the "tricks" behind magic!


And that was my 48 hours in Las Vegas, ending with a early morning (delayed) flight out of Las Vegas along with chilly temperature and snow in the mountains!


happy travels!
Farhana 
Don't forget, caring is sharing!